Illustration + Design

blog

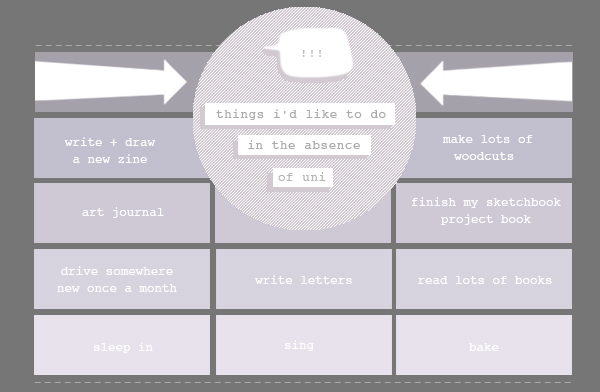
List | To Do
394bf0862ee711e2900e22000a1f96c7_7

Untitled-1

Uni is over for me for some time and I've been thinking about how I'd like to spend the next few months. Hopefully, creatively and with lots of relaxing, while my belly grows. The above were just the first things that came into my mind that made me feel excited. I'd like to have lots of happy, fulfilling days. The sun doesn't set here until about 9pm and I really love taking walks in the early evening. I have been picking flowers to press and C and I admire all of the beautiful houses in our neighbourhood. I've felt a little bit of that you-won't-have-time-for-these-things-in-a-few-months pressure but generally I feel like I'll just make the best of things.

Despite my initial (and continued) cringing, I have begun looking at baby items (cots, prams, etc). Today I discovered my first (tiny human growing) stretch mark. At first I felt fairly unhappy about it, but then it kind of made me smile. Then I doused myself in Bio-oil. I'm still not sure how to feel/talk about this kind of stuff. I feel guilty for not immediately loving pregnancy. I don't hate it at all, I just feel kind of neutral about it. I am also incredibly impatient and I just want my tiny human now.

What's something that you're excited to do once you have the spare time for it?

Guess What...
IMG_6052

Yep!

It turns out, I am the temporary vessel for a tiny, growing human. It is only about 1/3 of the way done. We found out quite late into things and it was a big surprise. I am definitely still coming to terms with it, but it's growing on me more and more each day (literally). I haven't been very active on my blog for the last few months, for no reason in particular, I just kind of dwindled, and when I've felt the urge to lately, I've felt like I couldn't be totally honest. So, I'm glad you now know this newsy bit of news.

Working out how a small human would fit into the equation hasn't been too difficult - C has always (conveniently) been the person who has wanted to stay home and cook and clean and look after children, and so, my lack of enthusiasm for most of those things, teamed with my desire to go into full time teaching in the next couple of years, makes this a pretty good arrangement.

I'll admit, I am excited, but incredibly nervous. But mostly excited.

The best parts about growing a tiny human (so far):
+ Growing a tiny human
+ Thinking that it looked like it had a beard in the ultrasound (C has a big beard).
+ Hearing its heartbeat for the first time and having it trying to kick and swim away from the little machine that the midwife was poking around my stomach with.
+ Making up nicknames (Squid, Space Invader, Bagel, etc).
+ Making up real names.
+ Making C do things for me (even though he already does a million things for me a day).
+ Finding opportune moments to tell people and them being excited.
+ Being pregnant at the same time as my half sister and sister in law.
+ Second trimester happy hormones.

The worst parts about growing a tiny human (so far):
+ Being in that in between stage where people aren't really sure if you're pregnant or just have a round belly. Being on a really rough and packed articulated bus and really wanting a seat but not wanting to ask for a seat (C made me stick my stomach out, so yes, I got a seat).
+ Sickness. For many weeks, 24/7. I have acquired the skill of throwing up mid-conversation, then continuing talking in the next breath. Also, all sorts of receptacles look useful when you're throwing up several times a day. C is basically my hero for dealing with me while I've been so sick.
+ Worrying that the way I sit, or lie, or something I eat, or any kind of movement might hurt it.
+ The prices of baby paraphernalia.
+ Appearance negativity (Where is my beautiful glowing pregnancy skin? Why do my clothes not fit already?)
+ Worrying about not having finished my degree and wondering when I might get back to it (in due course, I'm sure).
+ No soft cheese.

In closing, a small human should emerge some time in May. C is hoping it is a cat, jk. I can't see myself evolving into a full-time Mommy Blogger, but I will keep this blog updated with some details along the way.

Happy days!

DIY | Lino Cut Alphabet Stamps
IMG_6086

Since taking a print making class at uni last semester, I've become a bit obsessed with printing. My particular favourite technique is relief printing - carving into lino or wood to make a design, then covering the surface with ink and making a print onto paper. I really liked making woodcuts as I found that the harder surface, with more resistance, gave more precise marks with my carving tools and a cleaner print. Lino is fun too, and if you buy an easy-carve type. you can easily and quickly make simple designs. At uni we used industrial presses to transfer the ink on the design cleanly onto paper, but similar results can be achieved at home - I have a Japanese bamboo baren that I use to apply pressure onto larger wood/lino cuts.

If you make a lot of relief prints, this tutorial will probably seem like a really hack version of print making for you - but my main aim was just to introduce the idea of lino cuts to those who mightn't have gotten to make them before. If you have any tips to share, do comment!
IMG_6122

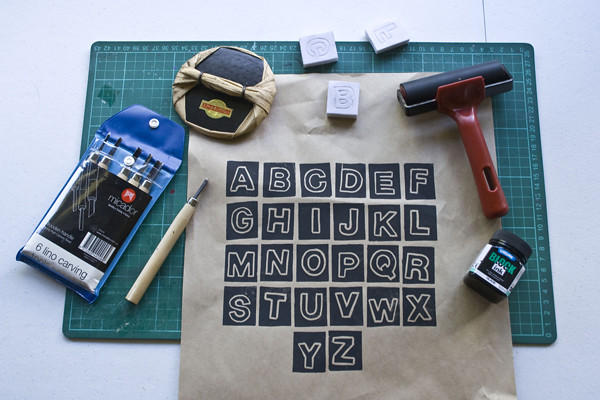
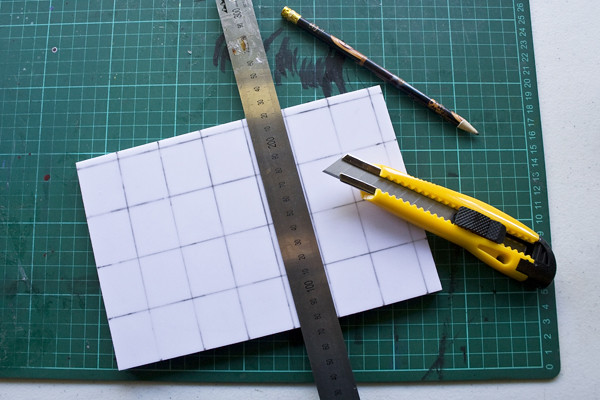
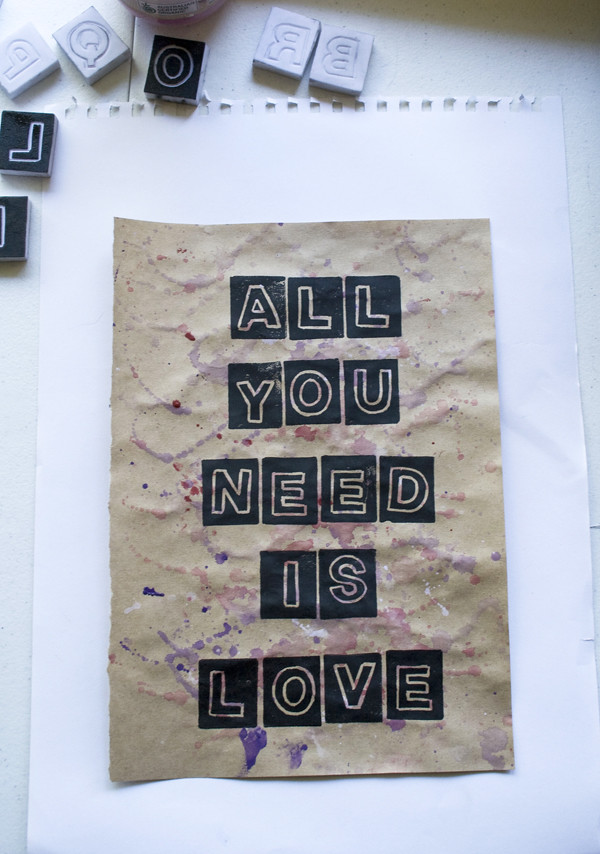
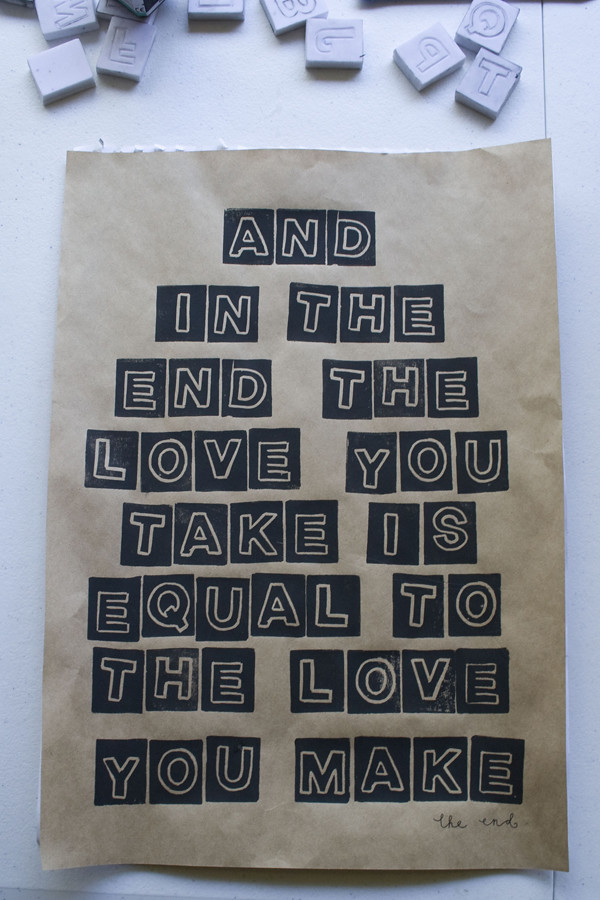
I made a bunch of prints with different designs for this subject, some with hand-drawing lettering, all with a Beatles lyric theme. I've wanted to make my own set of alphabet stamps for a while. I worked out how many letters I could fit onto my piece of lino (I could fit 28 squares - each 3cm x 3.5cm - so 26 letters and 2 left over squares, it's good to have leftovers incase you make a mistake). Alternatively you could cut out half this amount and make each stamp double sided. I ruled out lines across my piece of lino, marking them in with a pencil and then carefully cut out the blocks using a sharp utility knife.
IMG_6093

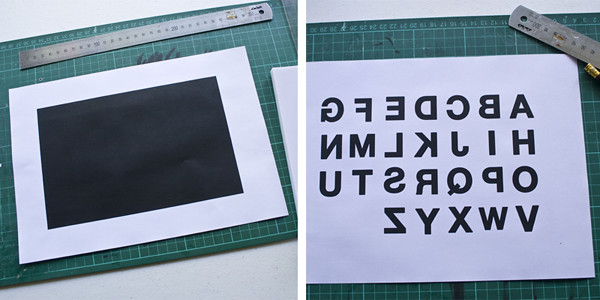
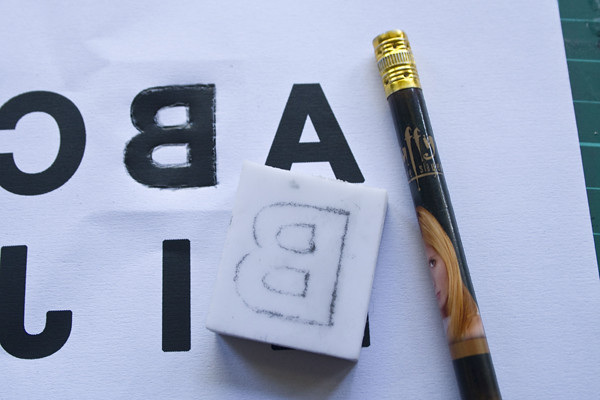
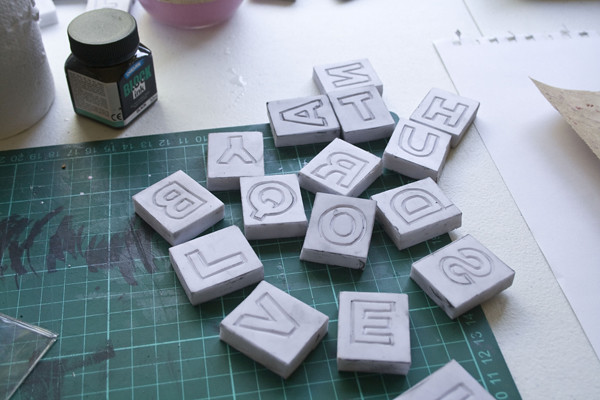
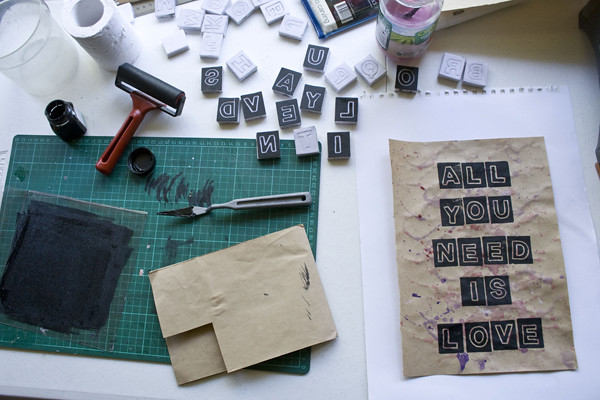
Because I wanted the letters to be precise, I decided to use a print out of the letters as a template and not do them freehand (maybe another project). First, I made a large flat black rectangle shape in Photoshop and printed that on one side of a piece of A4 paper with my laser printer. On the other side of the A4 sheet I printed my alphabet (created in Photoshop, making sure that each letter would fit easily within the 3cm x 3.5cm squares). The NUMBER ONE rule of making prints using lettering is to MAKE SURE THAT ALL OF YOUR LETTERS/WORDS ARE CARVED BACKWARDS. I can't stress this enough. I think everyone eventually has an experience of painstakingly carving a lino/wood cut only to realise once you've printed it that your letters/words are the mirror image of what they should be and there's nothing you can do but start again. Massive frustration.
IMG_6090
IMG_6099

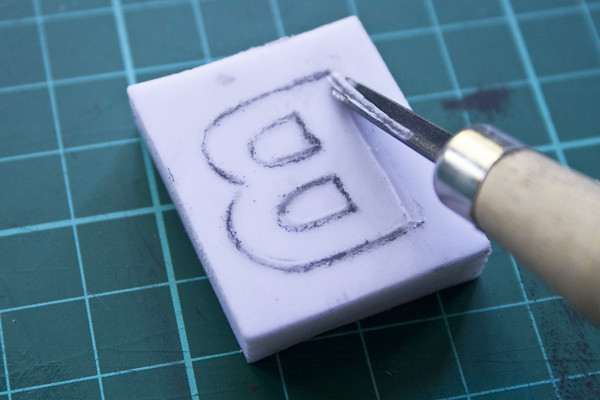
Using a laser printer, the black colour on the paper comes off easily if you rub it - this works well if you want to transfer an image onto another surface. I put each lino square underneath the corresponding letter on the paper and drew over the letter on the paper with a pencil - the letter shape is lightly transfered to the lino through the paper. I then drew over the letter on the lino with my pencil so that the shape to carve would be clearer.
IMG_6102
IMG_6108

I don't really have any major tips for carving the lino except to practice, be patient and work slowly. I'm definitely no pro. Round shapes are harder to carve than straight lines, but it can be done. When I was first making woodcuts my hands had little cuts all over them from using my tools badly. Always point the blade of the tool away from yourself. It is easy for the tools to slip and for you to ruin your design, take your time and get to know the materials. I wanted my letters to have a black area around them, but you could carve the white area around each letter instead if you prefer. Of course, where you carve will be the white space and where you don't will be what gets inked.
IMG_6107

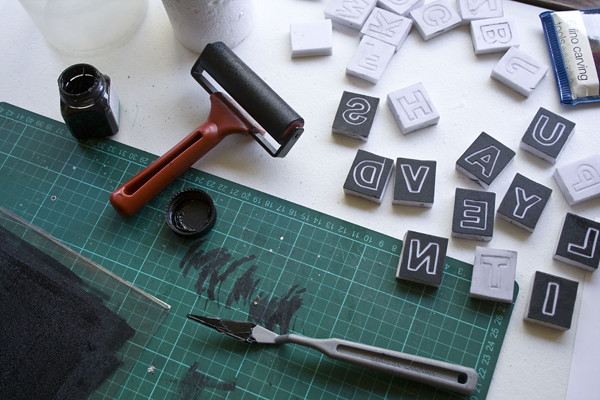
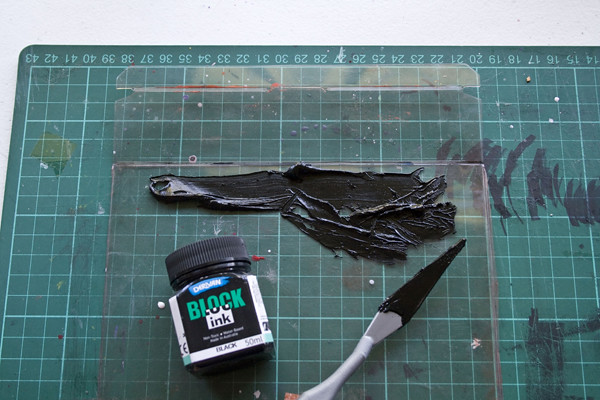
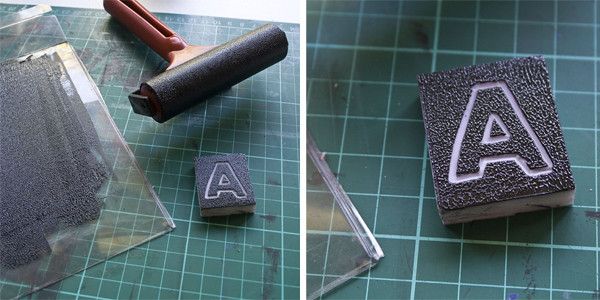
Once my letters were all carved, I applied an amount of ink (about a teaspoon) along the edge of my piece of plastic sheet using my palette knife, then using my roller, rolled the ink out onto the plastic. Don't just roll back and forth - put your roller into the ink, pick it up, let it spin, then roll it back, and repeat until the ink covers the plastic sheet evenly. At uni we were taught to 'listen to the ink' as you're rolling it and you'll know when there's too little or too much ink on the plastic sheet, I love the hiss it makes - otherwise, do a test print with an amount of ink on your lino to get an idea of whether you need to apply more ink. Always use less ink than you need, you can always add more.
IMG_6111

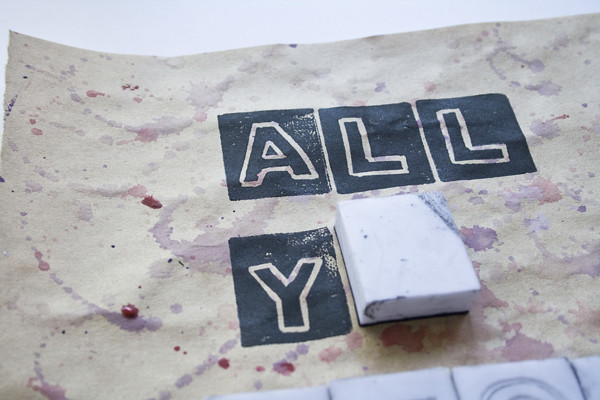
Once you've got a good amount of ink coverage on your lino cut, you just press the lino cut onto paper. You'll need to apply a lot of pressure so that the ink is evenly transferred - if you've made a print that is larger than my tiny blocks, using a baren to apply pressure might work better than just using your hands. If you've applied too much ink, the lino can move around a bit and smudge the ink. When using a press at uni, I would usually place my print on top of my inked wood/lino cut before rolling it through the press, but when I have small pieces of lino, I find it much easier to do it the other way around. I do kind of like the sketchy, imperfect quality of hand pressed prints though (like below).
IMG_6116
IMG_6117

If you're a cheapskate thrifty like me, once you're done you'll scrape the remaining ink from your tools off with your knife and put it back in your ink pot. Afterwards, try to remove the remaining ink from your tools and lino cuts by dampening some paper towel and rubbing the ink off and then putting the paper towel in the bin, rather than washing the ink straight down the drain.
IMG_6088

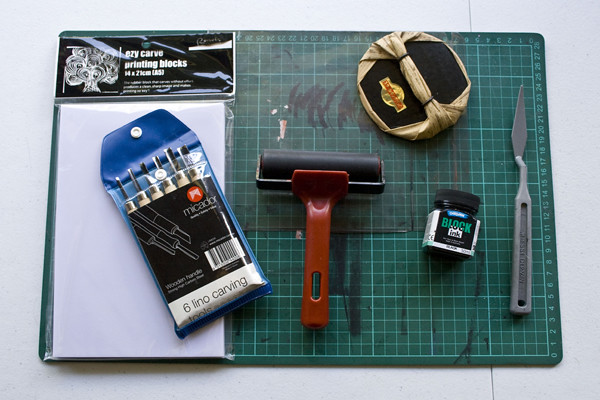
Tools I use:
+ Easy-carve lino (I used a 14cm x 22cm block)
+ A stanley knife
+ Lino cutting tools (especially the small V shaped tool for making precise cuts)
+ A hard rubber paint roller (not the soft foam sort)
+ Block printing ink (as these are often expensive, you can buy a block ink medium extender to add to good quality acrylic paints to make them the right viscosity for making block prints)
+ A palette knife (I have a small plastic one, but an ordinary plastic knife can do the job)
+ A piece of thick, flat plastic for rolling paint on (you can buy these, but I use a piece of flat clear plastic packaging I found, you could also use a flat piece of glass or metal).
IMG_6120
IMG_6125

Happy print making!

An Ode To Morrissey
IMG_3085
If you follow me via social media you'll know that last week while I was on holiday in Melbourne my cat Morrissey died. A friend of ours was minding our house/cats, and Morrissey, being forever the wanderer, was hit by a car two streets from our house.

IMG_2711
I got a phone call from a stranger at 8am who had seen him on the side of the road and called my number, having seen it on his collar tag. She stayed there with him until my father in law could come pick his body up, even though it made her late for work, because she said she had a cat of her own and she knew she'd appreciate the same kind of care for him in that situation. I've since discovered that we have some mutual friends and I'd like to send her a thank you card.

164159_479575667879_741504_n
Morrissey was my first cat and he was very special to me. I paid ten dollars for him to a man who looked kind of Amish and he was probably only about four weeks old when we got him. He was very headstrong and loved to explore and it was impossible to keep him locked up for long - he was feisty and always got what he wanted. C had hoped we'd be able to move out to the country in the next year or two, where Morrissey could go for long walks and explore more safely.

170527_10150089237152880_2996968_o
He rarely caught animals, but the day before we left he caught a bird and ran through the house with it, then a few hours later, he caught a rat and ran through the house with it ("Oh, you didn't like the bird I caught you? How about this rat?!"). After disposing of their corpses, we locked him in the laundry for an hour as punishment (I was actually kind of impressed) but reconciled before we left the next morning.

72041_475351132879_2282442_n
a5598d8a934a11e18cf91231380fd29b_7
He was a very charming cat with a lot of personality and my heart feels sore thinking about him. C's dad buried him in our yard while we were on holidays and kept his collar for us. I'd like to plant flowers on his grave and make a little plaque.

166330_477381922879_851842_n
IMG_0528 copy

Morrissey liked:
+ Suckling on C's t-shirts until he left big cat spit marks around the neck
+ Spooning with and grooming our other little cat Dexter
+ Exploring, especially other people's gardens
+ Fake meat
+ Sleeping between us in bed with his head on the pillow
+ Sitting on windowsills
+ Making high pitched screaming noises (he didn't meow, he screamed)
+ Making friends
+ Laying in the sun

Some of my favourite posts about Morrissey:
+ This Charming Cat
+ Morrissey's Photos Pt. 1
+ Morrissey's Photos Pt. 2
+ List: Things That Morrissey Does
+ My Cat, The Artist